SPPU FY BBA(CA) HTML SLIP SOLUTIONS
- HTML

Basic HTML Tag List File :
https://fybbacahtmlslip.edublogs.org/files/2023/09/TAG-1.docx
2ND SEM PRATICAL SLIP:
Let’s Begin :
Slip 1 : Create HTML page to Divide the frames into different sections as shown below and add appropriate HTML file to each frame : (In this we will create 6 frames to execute this program….[Exa: frame 1,frame 2,etc..])

/* Main Code : */

<!DOCTYPE html>
<html>
<frameset rows="*,*,*">
<frameset cols="*">
<frame src="frame1.html">
</frameset>

<frameset cols="*,*">
<frame src="frame2.html">
<frame src="frame3.html">
</frameset>

<frameset cols="*,*,*">
<frame src="frame4.html">
<frame src="frame5.html">
<frame src="frame6.html">
</frameset>
</frameset>
</html>
/* Frame 1: frame1.html */

<html>
<head>
<title>Frame 1</title>
</head>
<body bgcolor="light blue">
<center><font size="8">Enter Your Name..<br>Enter Your City..<br></center>
</font>
</body>
<html>
/* Frame 2: frame2.html */
<html>
<head>
<title>Frame 2</title>
</head>
<body bgcolor="pink">
<ul>
<ul type="square">
<font size="6">
<li>Blue</li>
<li>Green</li>
<li>Grey</li>
<li>Red</li>
</ul>
</font>
</body>
</html>
/* Frame 3: frame3.html */

<html>
<head>
<title>Frame 3</title>
</head>
<body bgcolor="yellow">
<font size="6">
<ol type="1">
<li>Nashik</li>
<li>Pune</li>
<li>Mumbai</li>
<li>Dhule</li>
</ol>
</font>
</body>
</html>
/* Frame 4: frame4.html */
<html>
<head>
<title>Frame 4</title>
</head>
<body bgcolor="red">
<marquee><font size="6"><br><br><br>"My Future Is Bright Due To My Parent's Support."</font>
</marquee>
</body>
</html>
/* Frame 5: frame5.html */

<html>
<head>
<title>Frame 5</title>
<body bgcolor="green">
<br><br>
<font size="5">
<center>
<blink>Here is your text that has to blink.</blink>
</font></center>
</body>
</html>
/* Frame 6: frame6.html */
<html>
<head>
<title>Frame 6</title>
</head>
<body bgcolor="azure">
<font size="6">
<ol type="1">
<li>India</li>
<li>USA</li>
<li>Russia</li>
<li>Canada</li>
</ol>
</font>
</body>
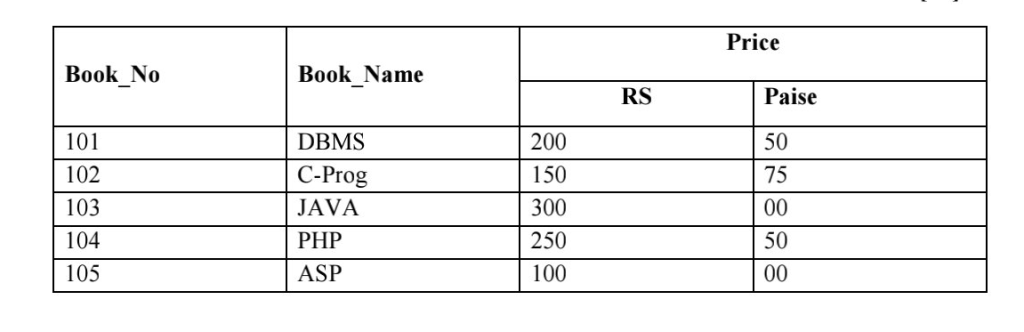
</html>Slip 2 : Write the HTML code the following table. Use internal CSS to format the table.
/*Main code */

<!DOCTYPE html>
<html>
<head>
<style type="text/css">

//internal CSS
table,th,td,tr
{
border: 1px solid;
width: 30%;
}

.a{
text-align : center;
}

.b{
text-align: center;
}

</style>

<title>List</title>
</head>
<body>
<table>
<tr>
<th rowspan="2">Book_No</th>
<th rowspan="2">Book_Name</th>
<th colspan="2">Price</th>
</tr>
<tr>
<th class="a">RS</th>
<th class="b">Paise</th>
</tr>
<tr>
<td>101</td>
<td>DBMS</td>
<td>200</td>
<td>50</td>
</tr>
<tr>
<td>102</td>
<td>C-Prog</td>
<td>150</td>
<td>75</td>
</tr>
<tr>
<td>103</td>
<td>JAVA</td>
<td>300</td>
<td>00</td>
</tr>
<tr>
<td>104</td>
<td>PHP</td>
<td>250</td>
<td>50</td>
</tr>
<tr>
<td>105</td>
<td>ASP</td>
<td>100</td>
<td>00</td>
</tr>
</table>
</body>
</html>
Slip 3 : Write a HTML code to design a web as per given specification. Divide the browser screen into two frames. The first frame will display the heading. Divide second frame into two columns. The frame on left should be name of cities consisting of hyperlinks. Clicking on any one of these hyperlink will display related information in right hand side frame as shown below.

*/ Main Code : */

<!DOCTYPE html>
<html>
<frameset rows="30%,*">
<frame src="header.html" name="frame1">
<frameset cols="30%,*">
<frame src="links.html" name="frame2">
<frame src="pune.html" name="frame3">
<frame src="mumbai.html" name="frame3">
</frameset>
</frameset>
</html>
/* Frame 1: header.html */

<html>
<head>
<body>
<h1>
<font color="red">IT Industries in India</font>
</h1>
</body>
</html>
/* Frame 2: pune.html */

<html>
<body>
<h3>Pune</h3>
<ul type="disc">
<li>Infosys</li>
<li>Persistent</li>
</ul>
</body>
</html>
/* Frame 2: mumbai.html */

<html>
<body>
<h3>Mumbai</h3>
<ul type="disc">
<li>iGate</li>
<li>Casepoint</li>
</ul>
</body>
</html>
/* Frame 3: links.html */
<html>
<head>
<title>Frame</title>
</head>
<body>
<b>City</b><br>
<ol type="1">
<li><a href="pune.html" target="frame3">Pune</a></li><br>
<li><a href="mumbai.html" target="frame3">Mumbai</a></li><br>
</ol>
</body>
</html>
Slip 4 : Create HTML web page with following specifications : 1) Title should be about your college. 2) Put image in the background. 3) Place your college name at the top of page in large text followed by address in smaller size. 4) Add names of course offered , each in different color, style and font. 5) Add scrolling text about college. 6) Add any image at the bottom. (**Use External CSS to format the webpage.**)
/* Main code:  (student can choose own their images in these code). */

<!DOCTYPE html>
<head>
<title>cmcs college</title>
<link rel="stylesheet" href=mystyle.css>
</head>
<body>
<h1>C.M.C.S. College,</h1><h3>Nashik</h3></h1><br>
<h2>COURSES</h2>
<ol type="1">
<li>BBA</li><br>
<li>BBA(IB)</li><br>
<li>BBA(CA)</li><br>
<li>B.com</li><br>
<li>BSC.(Comp.Science)</li>
</ol><br><br>
<marquee>NAAC ACCREDITED AT 'A' GRADE COLLEGE</marquee><br><br>
<img src="34.jpg" height="300" width="700" alt="34.jpg" class="center">
</body>
</html>
/* External CSS code : mystyle.css  */

body
{
         background-color: powderblue;
         background-image: url("OIP.jpeg");
	background-repeat: no-repeat;
	background-size: cover;

}


h1
{
     color: orangered;
     font-size: 30px;
     text-align: center;
}

h2
{
     text-align: center;
    font-style: italic;
    color: navy;
}

h3
{
     color: orange;
     font-size: 30px;
     text-align: center;
}

.center
{
            display: block;
            margin-left: auto;
            margin-right: auto;
            width: 40%;
 }

h4
{
     color: maroon;
 }


ol
{
   text-align: center;
   color: #c71585;
   font-style: oblique;
   font-weight: bold;
  }

marquee
{
  color: red ;
  font-size: xx-large;
}
Slip 5 : Write HTML code to design a website for Online Shopping. Design home page which consists of list of items each with hyperlink, clicking on which should display related information on separate web page. (**Use External CSS to format each web page.**)
/* Main Code : */

<html>
<head>
<link rel="stylesheet" href="style.css">
<frameset rows="30%,*">
<frame src="header.html" name="frame 1">
<frameset cols="30%,*">
<frame src="links.html" name="frame2">
<frame src="info.html" name="frame 3">
</frameset>
</frameset>
</head>
</html>
/* header.html */

<html>
<head>
<link rel="stylesheet" href="style.css">
<title>shopping website</title>
</head>
<body>
<h1>Online Shopping</h1>
<br>
</body>
<html>
/* links.html */

<html>
<head>
<link rel="stylesheet" href="style.css">
</head>
<body>
<b><h3>Items:</h3></b><br>
<ol>
<ol type="I">
<li><a href="info1.html" target="frame 3">Shirt</a></li><br>
<li><a href="info2.html" target="frame 3">Jeans</a></li><br>
</ol>
</body>
</html>
/* info1.html */

<html>
<head>
<link rel="stylesheet" type="text/css" href="style.css">
</head>
<body>
<h2>Shirts</h2>
<img src="1.jpg" height="50%" width="40%">
<br><br>
<p>The world's oldest preserved garment, discovered by Flinders Petrie, is a "highly sophisticated" linen shirt from a First Dynasty Egyptian tomb at Tarkan, dated to c. 3000 BC: "the shoulders and sleeves have been finely pleated to give form-fitting trimness while allowing the wearer room to move. The small fringe formed during weaving along one edge of the cloth has been placed by the designer to decorate the neck opening and side seam."</p>
<br>
<p>Sizes:-
Asia Size M = US/EU Size XS.<br>
Asia Size L = US/EU Size S.<br>
Asia Size XL = US/EU Size M.<br>
Asia Size XXL = US/EU Size L.<br>
Asia Size XXXL = US/EU Size XL.<br>
Asia Size XXXXL = US/EU Size XXL.</p><br>
</body>
</html>
/* info2.html */

<html>
<head>
<link rel="stylesheet" type="text/css" href="style.css">
</head>
<h2>Jeans</h2>
<img src="2.jpg" height="50%" width="40%"><br><br>
<p>Jeans are a type of pants or trousers made from denim or dungaree cloth. Often the term "jeans" refers to a particular style of trousers, called "blue jeans", with copper-riveted pockets which were invented by Jacob W. Davis in 1871[1] and patented by Jacob W. Davis and Levi Strauss on May 20, 1873. Prior to the patent, the term "blue jeans" had been long in use for various garments (including trousers, overalls, and coats), constructed from blue-colored denim.</p>
<br>
<p>"Jean" also references a (historic) type of sturdy cloth commonly made with a cotton warp and wool weft (also known as "Virginia cloth"). Jean cloth can be entirely cotton as well, similar to denim. Originally designed for miners, modern jeans were popularized as casual wear by Marlon Brando and James Dean in their 1950s films, particularly The Wild One and Rebel Without a Cause,[3] leading to the fabric becoming a symbol of rebellion among teenagers, especially members of the greaser subculture. From the 1960s onwards, jeans became common among various youth subcultures and subsequently young members of the general population. Nowadays, they are one of the most popular types of specialty trousers in Western culture. Historic brands include Levi's, Lee, and Wrangler.</p>
<br>
<br>
</html>
/* External CSS Code : style.css */
body
{
background-color: lightblue;
}
h2
{
color: red;
}
h1
{
color: orange;
text-align: center;
}
h3
{
color: Blue;
}
Slip 6 : Write a HTML code to display calendar of current month in tabular format. Use proper color for week days and holidays. Display month name, year and images as advertisement at the beginning of the calendar.
/* Main Code */

<!DOCTYPE html>
<html>
<head>
<title>Current Month Calender</title>
</head>
<body bgcolor="pink">
<center>
<img src="image1.jpg" width="300" height="300"><br><br></center>
<b><center><font color="blue"><h1>March 2023</h1></font></b></center>
<table border="1"align="center">
<tr>
<th><font color="red">Sunday</font></th>
<th>Monday</th>
<th>Tuesday</th>
<th>Wednesday</th>
<th>Thursday</th>
<th>Friday</th>
<th>Saturday</th>
</tr>

<tr align="center">
<td><font color="red"></td>
<td></td>
<td></td>
<td>1</td>
<td>2</td>
<td>3</td>
<td>4</td>
</tr>

<tr align="center">
<td><font color="red">5</td>
<td>6</td>
<td><font color="red">7 <br>Holi</td>
<td>8</td>
<td>9</td>
<td>10</td>
<td>11</td>
</tr>

<tr align="center">
<td><font color="red">12</td>
<td>13</td>
<td>14</td>
<td>15</td>
<td>16</td>
<td>17</td>
<td>18</td>
</tr>

<tr align="center">
<td><font color="red">19</td>
<td>20</td>
<td>21</td>
<td><font color="red">22<br>Gudi Padwa</td>
<td>23</td>
<td>24</td>
<td>25</td>
</tr>

<tr align="center">
<td><font color="red">26</td>
<td>27</td>
<td>28</td>
<td>29</td>
<td><font color="red">30<br>Ram Navami</td>
<td>31</td>
</tr>

</table>
</body>
</html>
Slip 7 : Write a HTML code to display Theory Time Table of FY BBA(CA) . Use internal CSS to format the table.
/* Main Code  */

<!DOCTYPE html>
<html>
<head>
<title>Time Table</title>

/* Internal CSS */
<style>
body
{
background-color: #f0ffff ;
}

th
{
font-weight: bold;
background-color: #cccccc;
}

tr
{
text-align: center;
}

h1
{
color: red;
text-align: center;
}

.center
{
margin-left: auto;
margin-right: auto;
}
</style>
</head>


<body>
<h1>FY BBA(CA) TIME TABLE<br>DIV : A</h1><br><br>
<table border="1" class="center">
<tr>
<th>Time</th>
<th>Monday</th>
<th>Tuesday</th>
<th>Wednesday</th>
<th>Thursday</th>
<th>Friday</th>
<th>Saturday</th>
</tr>

<tr>
<th>8:45-9:30</th>
<td>FA</td>
<td>FA</td>
<td>OB&HRM</td>
<td>OB&HRM</td>
<td>FA</td>
<td>FA</td>
</tr>

<tr>
<th>9:30-9:45</th>
<th colspan="6">RECESS</th>
</tr>

<tr>
<th>9:45-10:30</th>
<td>OB&HRM</td>
<td>OB&HRM</td>
<td>RDBMS</td>
<td>RDBMS</td>
<td>BM</td>
<td>BM</td>
</tr>

<tr>
<th>10:30-11:15</th>
<td>WT</td>
<td>WT</td>
<td>WT</td>
<td>WT</td>
<td>RDBMS</td>
<td>RDBMS</td>
</tr>

<tr>
<th>11:15-12:00</th>
<td>BM</td>
<td>BM</td>
<td>Advance C</td>
<td>Advance C</td>
<td>Democracy</td>
<td>Democracy</td>
</tr>

<tr>
<th>12:00-3:00</th>
<td>LAB BATCH-I</td>
<td>LAB BATCH-II</td>
<td>LAB BATCH-III</td>
<td>PE</td>
<td>-</td>
<td>-</td>
</tr>
</table>
</body>
</html>
Slip 8 : Create HTML page with following specifications : 1) Title should be about your self. 2) Color the background by Pink color. 3) Place your city name at the top of page in large text and in blue color. 4) Add names of yours family members each in different color, style, and font. 5) Add scrolling text about your family. 6) Add any image at the bottom. (**Use Internal CSS to format the web page.**)
/*Main Code : (**NOTE: Student can choose their own image **) */


<html>
<head>
<title>Our name</title>
<style>

body
{
background-color: pink;
}

h1
{
color: blue;
text-align: center;
}

h2
{
color: brown;
text-align: center;
text-decoration : underline;
font-style: bold;
}

p.a
{
color: red;
font-style: italic;
}

p.b
{
color: green;
font-style: oblique;
}

p.c
{
color: purple;
font-style: italic;
}

p.d
{
color: lime;
font-style: inherit;
}

marquee
{
color: brown;
}

img
{
align: center;
}

</style>
</head>

<body>
<h1>Your Name </h1><br>
<h2>Areas :</h2>
<p class="a">Your Father name <br></p>
<p class"b">Your Mother name<br></p>
<p class="c">Your Brother name<br></p>
<p class="d">Your Sister name<br><br>

<marquee behaviour=slide><h4>Happy Family</h4></marquee><br><br>
<marquee behaviour=slide><h4>My family member is very excellent</h4></marquee><br><br>

<img src=123.jpg><br><br><br>


</body>
</html>
Slip 9 : Write the HTML code which generate the following output (**Use Internal CSS to format the table **).

/* Main code */

<!DOCTYPE html>
<html>
<head>
<title>Table</title>


<style type="text/css">
table,th,td
{
border: 1px solid blue;
width: 20%;
text-align: center;
}


</style>
</head>
<body>
<table>

<tr>
<th>Country</th>
<th colspan='2'>Population (in Crores)</th>
</tr>

<tr>
<td rowspan="3">INDIA</td>
<td>1998</td>
<td>85</td>
</tr>

<tr>
<td>1999</td>
<td>90</td>
</tr>

<tr>
<td>2000</td>
<td>100</td>
</tr>

<tr>
<td rowspan="3">USA</td>
<td>1998</td>
<td>30</td>
</tr>

<tr>
<td>1999</td>
<td>35</td>
</tr>

<tr>
<td>2000</td>
<td>40</td>
</tr>

<tr>
<td rowspan="3">UK</td>
<td>1998</td>
<td>25</td>
</tr>

<tr>
<td>1999</td>
<td>30</td>
</tr>

<tr>
<td>2000</td>
<td>35</td>
</tr>

</table>
</body>
</html>
Slip 10 : Write HTML code which generates the following output and Display each element of list in different size, color and font (**Use inline CSS to format the output**)

/* Main code */

<!DOCTYPE html>
<html>
<head>
<title>List</title>
</head>
<body style="background-color:lightgreen;">

<ol style="color: red;">
<ol type="1">
<li>DYP</li>
<ul type="disc" >
<li style="color:blue;">Courses</li>
<ul type="square">
<li style="color:brown;">BCS</li>
<li style="color:brown;">BCA</li>
</ul>
</ul>
<li>Indira</li>
<ul type="disc">
<li style="color:blue;">Courses</li>
<ul type="square">
<li style="color:brown;">BCA</li>
<li style="color:brown;">MCs</li>
</ul>
</ul>
<li>ATSS</li>
<ul type="disc">
<li style="color:blue;">Courses</li>
<ul type="square">
<li style="color:brown;">BBA</li>
<li style="color:brown;">BCS</li>
</ul>
</ul>
</body>
</html>
Slip 11 : Write HTML code which generates the following output and Display each element of list in different size, color and font . (**Use external CSS to format the output**)

/* Main  code */

<<!DOCTYPE html>
<html>
<head>
<title>List</title>
<link rel="stylesheet" href="style.css">
</head>
<body>
<ul class="a">

<li>Non Flowering Plant</li>
<ul class="b">
<li>Fern</li>
<li>Spore</li>
</ul>

<li>Flowering Plant</li>
<ul class="c">
<li>Lily</li>
<li>Rose</li>

<ol class="d">
<li>Red Rose</li>
<li>Pink Rose</li>
</ol>


</body>
</html>
/*External CSS (style.css) */

body
{
background-color: lightgreen;
}

ul
{
color: red;
font-size: 30px;
}

ol
{
color: navy;
font-size: 25px;
}

body
{
background-color: lightgreen;
}

ul
{
color: red;
font-size: 30px;
}

ol
{
color: navy;
font-size: 25px;
}

ul.a
{
list-style-type:disc;
}

ul.b
{
list-style-type:circle;
}

ul.c
{
list-style-type:square;
}

ol.d
{
list-style-type:number;
}
Slip 12 : Create HTML web page with following specifications : 1) Title should be about your college. 2) Put image in the background. 3) Place your college name at the top of page in large text followed by address in smaller size. 4) Add names of course offered , each in different color, style and font. 5) Add scrolling text about college. 6) Add any image at the bottom. (**Use Internal CSS to format the webpage.**)
/* Main code :  (**NOTE: Student can choose their own image **) */

<!DOCTYPE html>
<head>
<title>cmcs college</title>
<style>
body
{
         background-color: powderblue;
         background-image: url("OIP.jpeg");
	background-repeat: no-repeat;
	background-size: cover;

}


h1
{
     color: orangered;
     font-size: 30px;
     text-align: center;
}

h2
{
     text-align: center;
    font-style: italic;
    color: navy;
}

h3
{
     color: orange;
     font-size: 30px;
     text-align: center;
}

.center
{
            display: block;
            margin-left: auto;
            margin-right: auto;
            width: 40%;
 }

h4
{
     color: maroon;
 }


ol.a
{
   list-style-type: upper-roman;
   text-align: center;
   color: #c71585;
   font-style: oblique;
   font-weight: bold;
  }

marquee
{
  color: red ;
  font-size: xx-large;
}

</style>
</head>
<body>
<h1>C.M.C.S. College,</h1><h3>Nashik</h3></h1><br>
<h2>COURSES</h2>
<ol class"a">
<li>BBA</li><br>
<li>BBA(IB)</li><br>
<li>BBA(CA)</li><br>
<li>B.com</li><br>
<li>BSC.(Comp.Science)</li>
</ol><br><br>
<marquee>NAAC ACCREDITED AT 'A' GRADE COLLEGE</marquee><br><br>
<img src="34.jpg" height="300" width="700" alt="34.jpg" class="center">
</body>
</html>
Slip 13 : Write a HTML code which will divide web page in three frames. First frame should consists of name of college as heading. Second frame should consists of name of courses with hyperlinks. Once click on any course it should display subject of that course in third frame.
/* Main code */

<!DOCTYPE html>
<html>
<frameset cols="*,*,*">
<frame src="header.html" name="frame1">
<frame src="links.html" name="frame2">
<frame src="course.html" name="frame3">
</frameset>
</html>
/* header.html */
<html>
<body bgcolor="powderblue">
<h1 align="center">
<font color="red">C.M.C.S. College, Nashik</font>
</h1>
</body>
</html>/* links.html */
<html>
<body bgcolor="lightgreen">
<b>Course</b>
<br>
<ol type="1">
<li><a href="a.html" target="frame3">BCA</a></li><br>
<li><a href="b.html" target="frame3">BBA</a></li><br>
</ol>
</body>
</html>
/*a.html */

<html>
<body bgcolor="powderblue">
<h3>BCA</h3>
<ul type="disc">
<li>OB</li>
<li>C Prog</li>
<li>DBMS</li>
</ul>
</body>
</html>
/* b.html */
<html>
<body bgcolor="powderblue">
<h3>BBA</h3>
<ul type="disc">
<li>Business Communication</li>
<li>Principles of Management</li>
<li>Business Mathematics</li>
</ul>
</body>
</html>Slip 14 : Write a HTML code to display the name of your family members each in different color, size and style. Also display the following polynomial expression : a0+a1x1+a2x2+a3x3+a4x4
<!DOCTYPE html>
<html>
<head>
<title>My Family Members</title>
</head>
<body>
<h1>Enter your father name..</h1>
<h2>Enter your mother name..</h2>
<h3>Enter your sister name..</h3>
<h4>Enter your brother name..</h4>
<br><br><br>

<h2>Polynomial Expression : </h2>
a<sub>0</sub>+a<sub>1</sub>x+a<sub>2</sub>x<sup>2</sup>+a<sub>3</sub>x<sup>3</sup>+a<sub>4</sub>x<sup>4</sup>
</body>
</html>
Slip 15 : Create HTML code with following specifications : 1) Title should be about your City. 2) Color background by pink color. 3) Place your city name at the top of page in large text and in blue color. 4) Add names of the landmarks in your city, each in different color, style and font. 5) Add scrolling text about your City. 6) Add any image at the bottom. (***Use inline CSS to format the web page.***)
/* Main code :  (**NOTE: Student can choose their own image **) */

<html>
<head>
<title>My City</title>
</head>
<body bgcolor="pink">
<font size=8 face=arial color=blue><center>Nashik,Maharashtra</center><br></font>
<center><h2 style="color:brown; font-style: bold;text-decoration-line: underline;">Areas :</h2>
<p style="color:red; font-style: italic; font-size : 24;"  >Panchavati<br></p>
<p style="color:green; font-style: oblique; font-size : 24;"">New Cidco<br></p>
<p style="color:purple; font-style: italic; font-size : 24;"">Gangapur Road<br></p>
<p style="color:lime; font-style: inherit; font-size : 24;"">College Road<br><br>
<marquee behaviour=slide><h4 style="color:maroon;">Wonderful Place To Visit</h4></marquee><br><br>
<marquee behaviour=slide><h4 style="color:maroon;">Nashik Is The Land Of Rama.</h4></marquee><br></center><br>
<center>
<img src=123.jpg><br><br><br>

</center>
</body>
</html>
Slip 16 : Write HTML code which generates the following output and Display each element of list in different size, color and font . (**Use inline CSS to format the output**)

/*Main code */

<!DOCTYPE html>
<html>
<head>
<title>List</title>

</head>
<body style="background-color:lightblue;">
<ul>
<ul type="disc">
<li style="color:red;font-size:xx-large;">Honda</li>
<ul type="square">
<li style="color:blue;font-size:x-large;">Petrol</li>
<ol type="1">
<li style="color:brown;">Honda City</li>
<li style="color:brown;">Brio</li>
</ol>

<li style="color:blue;font-size:x-large;">Diesel</li>
<ol>
<li style="color:brown;">Amaze</li>
<li style="color:brown;">Brio</li>
</ol>
</ul>

<li style="color:red;font-size:xx-large;">Maruti-Suzuki</li>
<ul type="square">
<li style="color:blue;font-size:x-large;">Petrol</li>
<ol>
<li style="color:brown;">Swift</li>
<li  style="color:brown;">Ritz</li>
</ol>
<li style="color:blue;font-size:x-large;">Diesel</li>
<ol>
<li  style="color:brown;">Swift-Desire</li>
</ol>
</ul>
</ul>
</body>
</html>
Slip 17 : Design HTML Form for customer registration visiting a departmental store. Form should consists of each fields such as name, contact no, gender, preferred days of purchasing, favorite item(to be selected from a list of items) , suggestions, etc. You should provide button to submit as well as reset the form contents.
/*Main code */

<!DOCTYPE html>
<html>
<head>
<title>Customer Form</title>
</head>
<body bgcolor="#DADADA">
<fieldset>
<center>
<h1><b>Customer Registration Form</b></h1>
<img src="45.jpg" height="410" height="500">
 <form>
<font face="arial" size="5" color="blue"><b>Departmental Store</b></font><br><br>
<font size="3" face="arial">
Name: <input type="text" name="First Name"><br><br>
Address: <input type="text" name=''Address"><br><br>
Contact No.:  <input type="text" name="Contact No."><br><br>
Gender:
<input type="radio" name="gender" value="male" checked>Male
<input type="radio" name="gender" value="female">Female
<br><br>
Preferred days of purchasing Items: <br><br>
<input type="text"><br><br>
Date: <input type="date-local"><br><br>
Time: <input type="time-local" style="width:30px;"><input type="time-local" style="width:30px;">
<select>
<option value="dd/mm/yyyy">AM</option>
<option value="00:00">	PM</option>
</select><br><br>
Favourite Items:
<select>
<option value="other">Other</option>
<option value="vegetables">Vegetables</option>
<option value="fruits">Fruits</option>
<option value="grains">Grains</option>
<option value="canned goods">Canned Goods</option>
<option value="snacks">Snacks</option>
<option value="beverages">Beverages</option>
<option value="meat">Meat</option>
<option value="dairy">Dairy</option>
<option value="frozen">Frozen</option>
<option value="household">Household</option>
</select><br><br>
Suggestion:
<input type="text"><br><br>
<input type="submit" value="Submit">
<input type="reset" value="Reset">
</font>
</form>
</center>
</fieldset>
</body>
</html>
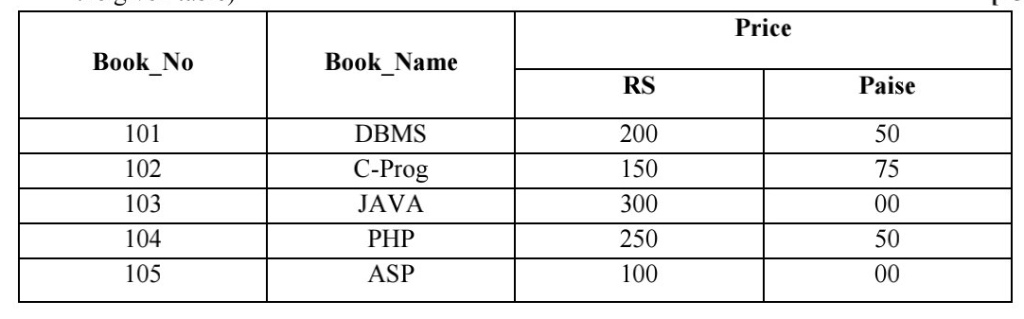
Slip 18 : Write HTML Code to generate the following output. (Use External CSS to format the given table.)
/* Main code */

<!DOCTYPE html>
<html>
<head>
<link rel="stylesheet" href="style.css">
<title>List</title>
</head>
<body>
<table>
<tr>
<th rowspan="2">Book_No</th>
<th rowspan="2">Book_Name</th>
<th colspan="2">Price</th>
</tr>
<tr>
<th class="a">RS</th>
<th class="b">Paise</th>
</tr>
<tr>
<td>101</td>
<td>DBMS</td>
<td>200</td>
<td>50</td>
</tr>
<tr>
<td>102</td>
<td>C-Prog</td>
<td>150</td>
<td>75</td>
</tr>
<tr>
<td>103</td>
<td>JAVA</td>
<td>300</td>
<td>00</td>
</tr>
<tr>
<td>104</td>
<td>PHP</td>
<td>250</td>
<td>50</td>
</tr>
<tr>
<td>105</td>
<td>ASP</td>
<td>100</td>
<td>00</td>
</tr>
</table>
</body>
</html>
/* style.css */

table,th,td,tr
{
border: 1px solid;
width: 30%;
text-align: center;
}

.a{
text-align : center;
}

.b{
text-align: center;
}
Slip 19 : Design an HTML form to take information of a customer for booking a travel plan consisting of fields such as name, address, contact no, gender, preferred season(Checkboxes), location type(to be selected from a list) etc.. You should provide button to submit as well as reset form contents. (All the fields should be properly aligned).
/* Main code */

<!DOCTYPE html>
<html>
<head>
<title>Booking Plan</title>
</head>
<body bgcolor="powderblue">
<fieldset>
 <h1 align="center">Customer Booking Form</h1>
<center><img src="34.jpg" align="center" height="600px" width="800px"><br><br>
<form>

 <font face="arial" size="5" align="center" color="red"> <b>Book Travel Plan </b></font><br><br><br>

Name: <br>
<input type="text" name="First Name"><br><br>

Address: <br>
<input type="text" name="Address"><br><br>

Contact no.: <br>
<input type="text" name="contact no."><br><br>
<input type="radio" name="gender" value="male"> Male
<input type="radio" name="gender" value="female"> Female
<br><br>

Select Preferred season <br>
	  <input type="checkbox">Spring
	  <input type="checkbox">Summer
	  <input type="checkbox">Monsoon
	  <input type="checkbox">Winter
	 <br> <br>

Location :<br>
<select>
	<option value="New Yourk">New Yourk</option>
  	<option value="Los Angeles">Los Angeles</option>
	<option value="California">California</option>
	<option value="india">india</option>
	<option value="Mumbai">Mumbai</option>
	<option value="New Delhi">New Delhi</option>
	<option value="Bangalore">Bangalore</option>
	<option value="London">London</option>
	<option value="Manchester">Manchester</option>
</select> <br><br>

Suggestion<br>
<textarea name="mesasage">
  </textarea>
<br><br>


<input type="submit" value="Submit">
<input type="reset" value="Reset">
</center>
 </fieldset>
 </form>
  </body>
  </html>
Slip 20 : Create HTML page with following specifications : 1) Title should be about your Car. 2) Color background by pink color. 3) Place your car name at the top of page in large text and in blue color. 4) Add names of features in your city, each in different color, style and font. 5) Add scrolling text about your Car. 6) Add any image at the bottom. (***Use External CSS to format the web page.***)
/* Main code:  (**NOTE: Student can choose their own image **) */


<html>
<head>
<title>Fortuner</title>
<link rel="stylesheet" href="style.css">
</head>

<body>
<h1>Toyota Fortuner</h1><br>
<br><br>
<h2>Features...</h2>
<h4>Spacious and Luxurious Interior</h4>
<h3>Advanced Safety featured</h3>
<h4>Powerful Performance</h4>
<h3>Impressive Towing Capacity</h4>

<br><br><br>
<marquee> Fortuner is my favourite car because it's features is fantastic and also company gives advanced safety features....</marquee><br><br><br><br>

<div id="center">
<img src=download.jpeg><br><br><br>

</center>
</body>
</html>
/* style.css */

body
{
background-color:pink;
}

h1
{
color:green;
text-align: center;
}

h2
{
text-align:center;
}

h3
{
text-align:center;
color:red;
}

h4
{
text-align:center;
color:navy;
}


marquee
{
color: brown;
}

img
{
align:center;
width:400px;
height:400px;
}

#center
{
text-align:center;
}
Slip 21 : Write HTML code which generates the following output and Display each element of list in different size, color and font . (**Use internal CSS to format the output**)

/* Main code : */

<!DOCTYPE html>
<html>
<head>
<title>List</title>
<style>

body
{
background-color:lightyellow;
}

ul.a
{
list-style-type:circle;
color:red;
font-size:x-large;
}

ul.c
{
list-style-type:disc;
color:navy;
font-size:medium;
}

ol.e
{
list-style-type:number;
color:green;
font-size:xx-large;
}

</style>
</head>
<body>

<ul class="a">
<li>Coffee</li>
<li>Tea</li>

<ul class="c">
<li>Black Tea</li>
<li>Green Tea</li>

<ol class="e">
<li>Africa</li>
<li>China</li>
</ol>
</ul>
</ul>
</body>
</html>
Slip 22 : Create HTML page to Divide the frames into different sections as shown below and add appropriate HTML file to each frame : (***NOTE : In this program we will create 6 frame ***)

/* Main code : */

<!DOCTYPE html>
<html>
<frameset rows="*,*,*">
<frameset cols="*">
<frame src="frame1.html">
</frameset>

<frameset cols="*,*">
<frame src="frame2.html">
<frame src="frame3.html">
</frameset>

<frameset cols="*,*,*">
<frame src="frame4.html">
<frame src="frame5.html">
<frame src="frame6.html">
</frameset>
</frameset>
</html>
/* Frame 1: frame1.html */

<html>
<head>
<title>Frame 1</title>
</head>
<body bgcolor="light blue">
<center><font size="8">Enter Your Name..<br>Enter Your City..<br></center>
</font>
</body>
<html>
/* Frame 2 : frame2.html */
<html>
<head>
<title>Frame 2</title>
</head>
<body bgcolor="pink">
<ul>
<ul type="square">
<font size="6">
<li>Blue</li>
<li>Green</li>
<li>Grey</li>
<li>Red</li>
</ul>
</font>
</body>
</html>
/* Frame 3: frame3.html */

<html>
<head>
<title>Frame 3</title>
</head>
<body bgcolor="yellow">
<a href=" https://sppusybbacapracticalslipsolution.blog">1). My Blog With SY BBA (CA) Practical Solutions</a><br><br>
<a href="https://www.amazon.in/">2). Amazon</a>
</body>
</html>
/* Frame 4: frame4.html */
<html>
<head>
<title>Frame 4</title>
</head>
<body bgcolor="red">
<marquee><font size="6"><br><br><br>"My Future Is Bright Due To My Parent's Support."</font>
</marquee>
</body>
</html>
/* Frame 5: frame5.html */

<html>
<head>
<title>Frame 5</title>
<body bgcolor="green">
<br><br>
<font size="5">
<center>
<blink>Here is your text that has to blink.</blink>
</font></center>
</body>
</html>
/* Frame 6: frame6.html */

<html>
<head>
<title>Frame 6</title>
</head>
<body bgcolor="azure">

<center>
<img src="3344.jpg"   height="300" width="300">
</center>
</body>
</html>
Slip 23 : Write HTML code to create following table. (**Use External CSS to format the table**)

/* Main code : */

<!DOCTYPE html>
<html>
<head>
<title>Fee</title>
<link rel="stylesheet" href="sty.css">
</head>

<body>
<table>

<tr>
<th rowspan="2">Course</th>
<th colspan="3">Fee Structure</th>
<th rowspan="2">Year</th>
</tr>

<tr>
<th>FY</th>
<th>SY</th>
<th>TY</th>
</tr>

<tr>
<td>B.Sc.(CS)</td>
<td>20000</td>
<td>25000</td>
<td>30000</td>
<td>2017</td>
</tr>

<tr>
<td>BCA(Sci)</td>
<td>15000</td>
<td>20000</td>
<td>25000</td>
<td>2018</td>
</tr>

<tr>
<td>BBA(CA)</td>
<td>25000</td>
<td>30000</td>
<td>35000</td>
<td>2019</td>
</tr>

</table>
</body>
</html>
/* sty.css */

table,th,tr,td
{
border:1px solid;
}

th,td
{
padding-top: 5px;
padding-bottom: 10px;
padding-left: 20px;
padding-right: 20px;
}
Slip 24 : Write HTML code to display following list. (**Use Internal CSS to format the list**)

/* Main code : */

<html>
<head>
<title>Stream List</title>
<style>

ol.a
{
list-style-type:lower-roman;
}

ul.b
{
list-style-type:disc;
}


</style>
</head>
<body>
<ol class="a">
<li>Arts</li>
<ul class="b">
<li>BA</li>
<li>MA</li>
</ul>

<li>Commerce</li>
<ul class="b">
<li>Bcom</li>
<li>Mcom</li>
</ul>

<li>Science</li>
<ul class="b">
<li>B.Sc.</li>
<li>M.Sc.</li>
</ul>
</ol>
</body>
</html>
Slip 25 : Create HTML page to Divide the frames into different sections as shown below and add appropriate HTML file to each frame : (***NOTE : In this program we will create 6 frame ***)

/* Main code : */

<!DOCTYPE html>
<html>
<frameset rows="*,*,*">
<frameset cols="*">
<frame src="frame1.html">
</frameset>

<frameset cols="*,*">
<frame src="frame2.html">
<frame src="frame3.html">
</frameset>

<frameset cols="*,*,*">
<frame src="frame4.html">
<frame src="frame5.html">
<frame src="frame6.html">
</frameset>
</frameset>
</html>
/* frame1.html*/

<html>
<head>
<title>Frame 1</title>
</head>
<body bgcolor="light blue">
<center><font size="8">Enter Your Name..<br>Enter Your City..<br></center>
</font>
</body>
<html>
/* frame2.html
<html>
<head>
<title>Frame 2</title>
<body bgcolor="green">
<br><br>
<font size="5">
<center>
<blink>Here is your text that has to blink.</blink>
</font></center>
</body>
</html>
/* frame3.html */

<html>
<head>
<title>Frame 3</title>
</head>
<body bgcolor="yellow">
<font size="6">
<ol type="1">
<li>Nashik</li>
<li>Pune</li>
<li>Mumbai</li>
<li>Dhule</li>
</ol>
</font>
</body>
</html>
/* frame4.html */
<html>
<head>
<title>Frame 4</title>
</head>
<body bgcolor="azure">
<font size="6">
<ol type="1">
<li>India</li>
<li>USA</li>
<li>Russia</li>
<li>Canada</li>
</ol>
</font>
</body>
</html>/* frame5.html */
<html>
<head>
<title>Frame 5</title>
</head>
<body bgcolor="pink">
<ul>
<ul type="square">
<font size="6">
<li>Blue</li>
<li>Green</li>
<li>Grey</li>
<li>Red</li>
</ul>
</font>
</body>
</html>
/* frame6.html */

<html>
<head>
<title>Frame 6</title>
</head>
<body bgcolor="red">
<marquee><font size="6"><br><br><br>"My Future Is Bright Due To My Parent's Support."</font>
</marquee>
</body>
</html>
Slip 26 : Write HTML and CSS code to design a web page. Divide the browser screen into two frames. The first frame will display the headings. The second frame contains a menu consisting of hyperlinks. Clicking on any one of these hyperlink will display related information in a new page.
/* Main code : */

<!DOCTYPE html>
<html>
<frameset cols="*,*">
<frame src="header.html" name="frame1">
<frame src="links.html" name="frame2">
</frameset>
</html>
/* header.html */
<html>
<body bgcolor="powderblue">
<br><br><br><br>
<center>
<h1>Hi Welcome the web page </h1>
<h2>You can get information about link which is added in second frame </h2>
</center>
</body>
</html>/* links.html */
<html>
<head>
<style>
body
{
background-color:powderblue;
}
ul.u1
{
list-style-type: square;
}
</style>
<body>
<h2><i>India's Best City</i><h2>
<ul class="u1">
<li><a href="nashik.html" target="_blank">Nashik</a><br><br>
<li><a href="banglore.html" target="_blank">Banglore</a><br><br>
<li><a href="delhi.html" target="_blank">Delhi</a>
</ul>
</body>
</html>/* nashik.html */
<html>
<head>
<style>
body
{
background-color:powderblue;
}
ol.a
{
list-style-type:upper-roman;
}
</style>
<body>
<h1> Tourist places in Nashik city </h1>
<ol class="a">
<li>Godavari River</li>
<li>Trimbakeshwar</li>
<li>Ramghat</li>
<li>Kalaram Temple</li>
<li>Sitagufa</li>
</ol>
<br><br><br>
<a href="main.html">Go Back</a>
</body>
</html>/* banglore.html */
<html>
<head>
<style>
body
{
background-color:powderblue;
}
ol.a
{
list-style-type:upper-roman;
}
</style>
<body>
<h1> Tourist places in Banglore city </h1>
<ol class="a">
<li>Lalbagh Botanical Garden</li>
<li>Cubbon Park</li>
<li>ISKCON Temple</li>
<li>Bengalaru Palaces</li>
<li>Bannerghatta bilogical park</li>
</ol>
<br><br><br>
<a href="main.html">Go Back</a>
</body>
</html>/* delhi.html */
<html>
<head>
<style>
body
{
background-color:powderblue;
}
ol.a
{
list-style-type:upper-roman;
}
</style>
<body>
<h1> Tourist places in Delhi city </h1>
<ol class="a">
<li>India Gate </li>
<li> Red Fort</li>
<li>Qutab Minar</li>
<li>Rashtapati Bhawan</li>
<li>Raj Ghat</li>
</ol>
<br><br><br>
<a href="main.html">Go Back</a>
</body>
</html>Slip 27 : Write a HTML code to display calendar of current month in tabular format. Use proper color for week days and holidays. Display month name, year and images as advertisement at the beginning of the calendar.
/* Main Code */

<!DOCTYPE html>
<html>
<head>
<title>Current Month Calender</title>
</head>
<body bgcolor="pink">
<center>
<img src="image1.jpg" width="300" height="300"><br><br></center>
<b><center><font color="blue"><h1>March 2023</h1></font></b></center>
<table border="1"align="center">
<tr>
<th><font color="red">Sunday</font></th>
<th>Monday</th>
<th>Tuesday</th>
<th>Wednesday</th>
<th>Thursday</th>
<th>Friday</th>
<th>Saturday</th>
</tr>

<tr align="center">
<td><font color="red"></td>
<td></td>
<td></td>
<td>1</td>
<td>2</td>
<td>3</td>
<td>4</td>
</tr>

<tr align="center">
<td><font color="red">5</td>
<td>6</td>
<td><font color="red">7 <br>Holi</td>
<td>8</td>
<td>9</td>
<td>10</td>
<td>11</td>
</tr>

<tr align="center">
<td><font color="red">12</td>
<td>13</td>
<td>14</td>
<td>15</td>
<td>16</td>
<td>17</td>
<td>18</td>
</tr>

<tr align="center">
<td><font color="red">19</td>
<td>20</td>
<td>21</td>
<td><font color="red">22<br>Gudi Padwa</td>
<td>23</td>
<td>24</td>
<td>25</td>
</tr>

<tr align="center">
<td><font color="red">26</td>
<td>27</td>
<td>28</td>
<td>29</td>
<td><font color="red">30<br>Ram Navami</td>
<td>31</td>
</tr>

</table>
</body>
</html>
Slip 28 : Design a HTML form for Bus Ticket Reservation consisting of fields for Name, Address, Contact No., Source Station(Dropdown list), Destination Station, Date of booking, date of journey, no of passengers, name of passengers, gender of passengers, etc. You should provide button to submit as well as reset the form contents. (Use Proper Alignment) .
/* Main code : */

<!DOCTYPE html>
<html>
<body bgcolor="#A5D8DD">
<fieldset>
<center>

<font color="blue">
<h1 align="center"> Booking Reservation Registration From</h1></font><br>

<img src="bus.jpg" height="410px" width="710px"><br>

<form align="center">
<font face="arial" size="5" color="red"> Bus Ticket Reservation From </font><br><br>

<center>

Name:
<input type="text" name="First Name"><br><br>

Address:
<input type="text" name="First Name"><br><br>

Contact no.:
<input type="text" name="contact no."><br><br>

Source Station:
<select>
<option value="New Yourk">New Yourk</option>
<option value="Los Angeles">Los Angeles</option>
<option value="California">California</option>
<option value="india">india</option>
<option value="Mumbai">Mumbai</option>
<option value="New Delhi">New Delhi</option>
<option value="Beverages">Beverages</option>
<option value="Bangalore">Bangalore</option>
<option value="London">London</option>
<option value="Frozen">Frozen</option>
<option value="Manchester">Manchester</option>
</select>

				<br><br>
Destination Station:
<input type="text" name="First Name"><br><br>
Date of booking :
<input type="date-local"><br><br>

Date of Journey :
<input type="date-local"><br><br>
No. of Passenger:
<input type="text" name="contact no."><br><br>
Name of Passenger:
<input type="text" name="First Name"><br><br>

<input type="radio" name="gender" value="male" > Male
<input type="radio" name="gender" value="female"> Female
<br><br>

<input type="submit" value="Submit">
 <input type="Reset" value="Reset>

</center>
</fieldset>
</form>
</body>

</html>
Slip 29 : Create HTML code with following specifications : 1) Title should be about your City. 2) Color background by pink color. 3) Place your city name at the top of page in large text and in blue color. 4) Add names of the landmarks in your city, each in different color, style and font. 5) Add scrolling text about your City. 6) Add any image at the bottom. (***Use Internal CSS to format the web page.***)
/* Main code : (**Student can choose their own image**)  */


<html>
<head>
<title>My City</title>
<style>

body
{
background-color:powderblue;
}

h1
{
color:blue;
text-align:center;
}

h2
{
text-align:center;
color:brown;
 font-style: bold;
text-decoration-line: underline;
}

p.a
{
text-align:center;
color:red;
font-style:italic;
font-size:large;
}

p.b
{
text-align:center;
color:green;
font-style:bold;
font-size:large;
}

p.c
{
text-align:center;
color:purple;
font-style:italic;
font-size:large;
}

p.d
{
text-align:center;
color:green;
font-style:bold;
font-size:large;
}

h4
{
color:maroon;
}

</style>
</head>

<body>
<h1>Nashik,Maharashtra</h1><br>
<h2>Areas :</h2>
<p class="a">Panchavati<br></p>
<p class="b">New Cidco<br></p>
<p class="c">Gangapur Road<br></p>
<p class="d">College Road<br><br>
<marquee><h4>Wonderful Place To Visit</h4></marquee><br><br>
<marquee><h4>Nashik Is The Land Of Rama.</h4></marquee><br><br>

<img src=123.jpg><br><br><br>

</center>
</body>
</html>
Slip 30 : Write a HTML code to create the following table. (***Use External CSS to format the table.***)

/* Main code : */

<html>
<head>
<title>College Courses</title>
<link rel="stylesheet" href="sty.css">
</head>
<body>

<table>

<tr>
<th rowspan="2">College/Course</th>
<th colspan="2">Arts</th>
<th colspan="2">Commerce</th>
</tr>

<tr>
<td>UG</td>
<td>PG</td>
<td>UG</td>
<td>PG</td>
</tr>

<tr>
<td>D.Y.Patil, Pimpri</td>
<td>BA</td>
<td>MA</td>
<td>B.Com</td>
<td>M.Com</td>
</tr>

<tr>
<td>Indira College</td>
<td>BA</td>
<td>MA</td>
<td>BBA(CA)</td>
<td>MCA(Commerce)</td>
</tr>

<tr>
<td>Wadia College</td>
<td>BA</td>
<td>MA</td>
<td>B.Com</td>
<td>M.Com(ECommerce)</td>
</tr>

</table>
</body>
</html>
/* sty.css */

table,th,td,tr
{
border: 1px solid;
width: 30%;
text-align: center;
}

th, td{
padding-top: 10px;
padding-bottom: 20px;
padding-left: 20px;
padding-right: 30px;
}